
How to Sell On Shopify: A Beginner’s Guide to Succeed in 2021
Whether you are just starting your first online store or have been already selling products online for years. You must’ve heard about Shopify.
With growing number of online stores and their successes, more and more budding entrepreneurs want to start selling online. While there are many platform to sell products online like BigCommerce and WooCommerce, Shopify is still one of the most popular, with almost 20 percent market share.
In this post, you will find the detailed beginner’s guide about how to sell on Shopify. We will start with how to set up your store on Shopify, then cover some proven tips to promote your store and take it to the next level.

I am assuming that you have already selected the product to sell online and have your supply chain setup. In this post, we will only focus on setting your Shopify store and making it profitable.
Shopify is the world’s largest and most popular cloud based eCommerce store platform that helps established and new entrepreneurs to build an online store from scratch.
The biggest advantage of Shopify is its easy-to-use interface and lower startup cost. Shopify is a Software as a Service(SaaS) eCommerce platform that provides a wide range of features to help you sell products online and in person.
Shopify is very adaptable as per needs and you can quickly setup a Shopify store in minutes or use it to build a highly customized, multi-national, multi-lingual enterprise eCommerce website. To cater these needs, Shopify offers three different pricing plans starting from $29 / month.


Shopify also offers a free trail for 14 days, you can use this to test the Shopify platform before taking their subscriptions.
Advantages of Shopify
Shopify is a well designed eCommerce platform with well-established community and plenty of themes and apps to customized your online store for the best user experience.
Few benefits of using Shopify are as follows:
- Ease of use – Shopify is one of the most user-friendly eCommerce platform to start your online store. Whether you are a professional developer or a newbie, Shopify is easy to setup and its drag and drop features allows you to create an online store easily without much training.
- Cloud-based application – Shopify is a cloud-based application, which means by selling on Shopify you just have to think about your store marketing and sales management. The technical part like web server maintenance etc will be taken care by Shopify. This helps you in scaling your online business to next level without much worries.
- Highly Customizable – You don’t need to be a professional developer to use Shopify. Even if you are newbie and its your first store, Shopify themes allows you to have an attractive front-end design that your customer will love.
- Secure & reliable – In an eCommerce store, you will be dealing with sensitive user data like user information and their credit card details. Thus your site needs to be secure, reliable, fast and always online. Being a cloud-based hosted solution, Shopify takes care of all server related tasks, to ensure your site pages loads quickly and always available. SSL certificates can be enabled on Shopify store to make it secure, which encrypt all data that entered on your store.
- Mobile Responsiveness – Online shopping is increasing on mobile devices by a rapid rate, so its essential to have an online store to be mobile responsive. All themes available on Shopify are mobile-responsive, which means your store is optimized for mobile. Apart from this, Shopify iPhone and android app lets you manage your store on the go.
- Easy to Install Apps – There are tons of apps available for Shopify store to make it more feature-rich. For example, you can add apps for customer reviews, loyalty programs, customer wishlists, print-labels and packing slips, shipping partners, social media sites and many more. There are over 1500 apps for different purpose to choose from, both free and paid ones.
- SEO Friendly = SEO is important for your web store, so that customers can find you while searching for the products you sale. Shopify has powerful Search Engine Optimization (SEO) features that helps your website ranks higher in search results.
- Powerful Marketing Tools – The Shopify apps store has a huge range of marketing tools like social media integration, product reviews and targeted email marketing, discount coupons, custom gift cards etc to attract visitors and do more sales. You can also create beautiful landing pages for Google ads or PPC social media ads using Shopify.
- Easy Payment Systems – Its essential to have several payment options available in your online store to allow buyers to pay using different payment methods. Setting up payment gateway options on Shopify is very easy and they support different payment options like credit card, PayPal etc. It also support Stripe payment option, where no transaction fees are charged between you and your customers.
- 24/7 Customer Support – Shopify offers 24/7 round-the-clock reliable customer support service for its merchants. Experts are available to assist you via email, chat or phone to solve your Shopify related queries and help you run your store flawlessly.
How Much Does Shopify Cost?
Now that you have decided to start your online sore using Shopify, you must be aware of the different pricing plan it offers and which one is best for you to start with.
Shopify offers three main pricing plans to choose from, Basic Shopify at $29 per month, Shopify at $79 per month, and Advanced Shopify at $299 per month.

Basic Shopify ($29/month)
The basic Shopify plan allows you to sell unlimited number of products and is the cheapest plan available which enables you to create a fully functional standalone store. Basic Shopify plan offers following features:
- Fully functional standalone web store
- Sell unlimited number of products
- 2 Staff accounts
- 24/7 support via phone, email or live chat.
- Manual order creation facility
- Sell on online marketplaces and social media.
- Discount code creation
- Free SSL certificate
- Abandoned cart recovery
- Gift Card
- Discounted shipping rates
This plan comes with a transaction fees of 2% for each sales on your store, however there are no transaction fees if you will use Shopify Payments. Credit card fees are 2.9% + 30c if a purchase is made online and 2.7% + 0c if a purchase is made using the Shopify point of sale card reader and a mobile device.
Basic Shopify plan is good for merchant who are just starting out and have a limited budget but need a fully functional standalone web store.
Shopify ($79/month)
The next plan is called Shopify and is priced at $79 per month. The additional features this plan provide over Basic Shopify is as follows:
- Professional reporting
- More discounted shipping rates
- Allows USPS Priority Mail Cubic® pricing
- Lower transaction and credit card fees
This plan comes with a transaction fees of 1% for each sales on your store, however there are no transaction fees if you will use Shopify Payments. Credit card fees are 2.6% + 30c if a purchase is made online and 2.5% + 0c if a purchase is made using the Shopify point of sale card reader and a mobile device.
Shopify plan is good for merchant who have high-volume of online sales and requires professional reporting as well as discounted shipping rates.
Advanced Shopify ($299/month)
.The advance Shopify plan is priced at $299 per month. The additional features this plan provide over Shopify is as follows:
- Advanced report building
- Real time carrier shipping quotations from third parties
- Integrate with your own shipping accounts
- Extra discounted shipping rates
This plan comes with a transaction fees of 0.5% for each sales on your store, however there are no transaction fees if you will use Shopify Payments. Credit card fees are 2.4% + 30c if a purchase is made online and 2.4% + 0c if a purchase is made using the Shopify point of sale card reader and a mobile device.
Advanced Shopify plan is good for merchant who have very high-volume of online sales with monthly revenues in excess of $10,000 and require advanced reporting features as well as real-time-carrier shipping delivered by third parties.
What is Shopify Lite and Shopify Plus?
Apart from these three plans Shopify also offers a super in-expensive plan and a enterprise level plan for you to choose from. Here the details of those plans:
Shopify Lite
At only $9 per month, Shopify lite is one of the cheapest method to start selling products online using Shopify platform. It does not provide you a standalone fully functional online store. Rather, it provide following features:
- Sell products on an existing website
- Sell on Facebook
- Allows to use Shopify as a back-end system
This plan comes with a transaction fees of 2% for each sales on your store, however there are no transaction fees if you will use Shopify Payments. Credit card fees are 2.9% + 30c if a purchase is made online and 2.7% + 0c if a purchase is made using the Shopify point of sale card reader and a mobile device.
With Shopify lite you get a Buy button that you can embed in your existing website to sell products. This is ideal for you if you have an existing website and wants to add eCommerce functionality. For example, If you already have an WordPress website or blog, then you can display your products using this Buy button.
Shopify Plus
Shopify plus is an enterprise-level plan targeted at big eCommerce businesses who generates 6 to 7 figures in sales per year. This plan comes with all the features of Advanced Shopify plan plus enhanced features involving security, APIs and fulfillment.
This plan comes at a price of $2000 per month and is suitable for large businesses having extremely high volume of sales.
What Can You Sell on Shopify
You can sell any type of products in Shopify as long you are following their agreement terms and the products or services are not illegal. Following are the few popular products you can sell om Shopify
- Clothing
- Jewelry
- Home accessories
- Travel products
- Baby or maternity products
- Bags and luggage
- Fitness accessories
- Beauty products
- Kitchenware
- Pet products
- Automotive accessories
- And much more!
What Can’t You Sell on Shopify
Shopify does have restrictions of some items that you can’t sell on their platform. If you will sell these items on their platform, you might get suspended from their platform. The list is as follows:
- Alcohol
- Tobacco and E-Cigarettes
- Fireworks
- Firearms and Weapons
- Pharmaceutical Drugs
- Gambling products
- Regulated products or services
- Adult products
- Event tickets
- High-risk businesses like bankruptcy lawyers, technical support etc
- And more.
How to Sell on Shopify
Now that you have decided to start your online store with Shopify, lets dive into how to sell on Shopify. Following are the steps involved in setting up your Shopify store.
- Sign up with Shopify
- Set up your online store
- Choose a design for your store
- Modify Shopify settings
- Add your products
- Categorize your products
- Setup Payment Gateways
- Finalize your store
- Add a domain name
Sign up with Shopify
The obvious first step is to sign up with Shopify, visit Shopify.com, and click on Start free trail button.

You will be asked to enter your email address, password and store name. Make sure your store name is unique or Shopify will ask you to choose something else.
After this screen you will be asked whether you are already selling, your current revenue and which industry will you be operating in. You can simply select I‘am just playing around in Are you already selling? and I haven’t decided yet in Which industry will you be operating in?
Next you will be required to enter your name, address, country and contact number. Fill in all the details and once done, click Enter my store.
Set up your online store
After you have signed up, you will be redirected to your store admin panel. Now you are ready to setup your store, upload your products and setup payments and shipping methods.

The admin page will prompt you to do next steps like add a product, customize theme, add domain etc. We recommend you to choose design of your store first.
Choose a design for your store
The theme of your is what your customer will see when they visit your store. So choosing an attractive and good quality theme plays an important role in conveying your store brand and quality.
Shopify has its own themes store which contains tons of free and paid themes. These themes comes with full support from their designers and their quality is checked by Shopify itself.
All themes comes with a great set of modifications that you can make to personalize your store without even touching a line of code. Of course premium themes comes with more modification options but with a free theme also you can create a great looking website.
Remember there is always a few limitation on how much you can achieve modification options of the theme. If you are not fully satisfied with your theme experience, you can always hire a team of design agency Shopify has, called as ‘Shopify Experts’ to fully customize your store.
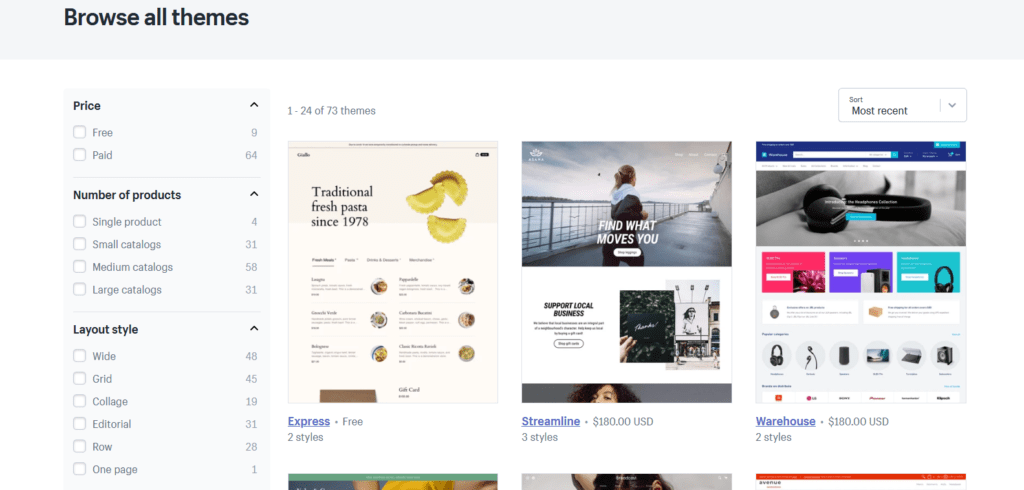
To find the perfect theme for your Shopify store, follow the following steps:
1. Browse the Theme Store
Log into your Shopify admin panel and visit Shopify Theme store, you will find a tons of themes to choose from including a good number of free ones.
Click on ‘Explore Themes’ to browse all the themes available. You can also filter these themes by free or paid, industry and feature wise. You can even sort the themes by Most recent, popularity and by price.
2. Check Theme Functionality and Reviews
Once you have found the theme you are looking for, click on the theme image for more details. You will be presented with theme details such as theme features, its reviews and options to preview demo.
Scroll down below to read the features and reviews of the theme.
3. Check Demo of the Theme
Next check the fully functional demo of theme by clicking on the button ‘View demo’.
You can also select different theme style, if the theme support, to check it and also preview the theme in desktop and mobile view.
4. Select the Theme for your Store
Once you have found your desired theme click on ‘Add theme’ button. Shopify will ask for your confirmation, just click on the button Publish as my Shop’s Theme.
After the theme is installed, Shopify will take you to your store Theme Manager. If you are not 100% satisfied with the selected theme you can always change your store theme using the same process as mentioned above.
Modify Shopify settings
Most Shopify themes come with several settings to make simple changes that can change the appearance of your store. In Shopify admin panel, click on ‘Themes’ in left hand menu, to go to the Theme Manager. It shows the published theme and unpublished themes below, if any.

On the live theme, there are two buttons, Actions is Customize. The first button Actions allows you do some basic settings changes like view, rename, duplicate and download theme file. If you want to make some changes to your theme, make sure to duplicate it first, in case you don’t like any changes, you can delete the duplicate and start over again.
The second button, Customize allows you make changes to your theme. Clicking this button will take you to a page where you can change some settings and customize the theme. You can use this to test out all the features of selected theme and customize it as per your needs.

Common features include in most themes are:
- Uploading logos
- Uploading slides to a homepage carousel
- Adding related item functionality to product pages
- Select number of products appear on each line of the collection pages
- Color schemes
- Font choices.
Add your products
Now that you have chosen a theme for your store, its time to add the products to your store, the most important thing for an online store. It can’t be an online store, if you don’t have anything to sell.
Your products are the one that will generate revenue for your store, so you must do it with your full attention and focus. To add products to you store, click on Products in the left side menu.

To add a product to your store, click on the button Add product, It will present you with a form to add products to your store. Most of the field are simple and easy to understand, try to fill as much as you can.

Some of the fields are as follows:
Title & Description – Enter the product name in the Title field and its description in the Description field. These fields tells your store visitors about what the product is and its information. Apart from this, this also important for your product organic SEO.
Images – For an online store, the images of the product matters a lot, since your visitors can’t check your products in person, they decide to buy a product by checking its images. So your product images must be of good quality. Along with good quality of image, it must be smaller is size also, otherwise it can slow down your store. Check these image optimization tips from Shopify.
To add images, scroll down to ‘images’ section and click on Add file button to upload images from your computer. You can also drag and drop images from your computer.
Pricing – This is where you can add the price of your product you want to charge from your customers.

Enter the price of the product in Price field. If you want to show a reduced price for the product, then move the product’s original price into Compare at price and enter a lower value into Price. You can also enter your cost price in the field Cost per item, then Shopify will show you the product profit margin and its value. This will not be shown to your customers.
Inventory – In this section, you can add inventory for your products. SKU or Stock Keeping Unit, is an unique identifier for each of the products in your store. If you have this information from your product manufacturer or supplier, you can enter it or simply leave it blank.

Enter the barcode and quantity of the product in the field Barcode and Quantity respectively.
Shipping – If you are selling a physical product, then you need to enter the shipping information. But if you selling a services or downloadable products, you can skip this field.

You must enter the weight of the product and the origin country of the product to calculate the shipping cost.
Variants – If you sell a product that comes in different variants, you can enter these information here. For example, t-shirts comes in different sizes and colors.

Search engine listing – You can add or edit meta title and description of the product here. it helps in the SEO of your product and should always added or edited for each product to help you rank higher.

Page title can either be same as product tile or you can add some keywords. The meta description can be same as your product description, but you should shorten it to max 160 characters or less, if its more.
Apart from manually adding products to your store, Shopify allows you other options also.
Import Product using CSV – If you have a large number of products in your store, then adding them manually is a tedious task In this case, bulk uploading of products by importing CSV file is a better option. You can lean more about it on Shopify official guide importing products with a CSV file.
Find products using Dropship store – If you want to start a dropshipping or print-on-demand business, you will not have to worry about managing inventory, packaging and sipping. You just need to connect to Oberlo, Spocket or Printful using app on Shopify and it will help you find and add products directly in your Shopify store.
Categorize your products
For your customers to easily access your products, make sure you categorize all your products in different collections. A collection is a group of products having common features that your customers might look when visiting your store. For example, if you sell clothes, then you can have different collections for men, women and children.
Apart from this, you can have different collections like items for sale, items of different sizes or colors, seasonal products etc. A product can also appear in more than one collection. Usually a collection is displayed on your store homepage or navigation bar. This helps customer easily find what they are looking for.
You can add a collection by clicking Collections in left hand side menu, in section Products. Then click on the button Create collection.

When you create a new collection, you have option to select how your products will be added to it. These are the options:
- Manually – You can add or remove a products from collection manually.
- Automatically – You can setup some selection condition to automatically add a product in a collection, if the conditions are met.
Set up payment gateway
This is the most crucial step while creating your Shopify store as these settings decide how you will get paid.
Fortunately, Shopify comes with its own in-built card processing called Shopify payments. So to use this, you actually don’t need to do anything, but they charge you 2.9% + 30c for every transaction based on your Shopify plan.
This is great for small businesses, but if you still want, you can use any third-party payment processors. To learn more about it visit How to Set up Payment Gateways on Shopify.
Finalize your store
Before you launch your Shopify store, you need to enter few more details about your company, shipping provider and tax details.
Add Non-Product Pages to Your Store
An online store needs other pages also along with product pages like About Us Page, Contact Us Page, FAQ Pages, Sizing Chart Pages etc.
To add a page to your store, click Pages in the left hand menu under Online store in your Shopify admin panel. Then click the button Add page, to create a new page
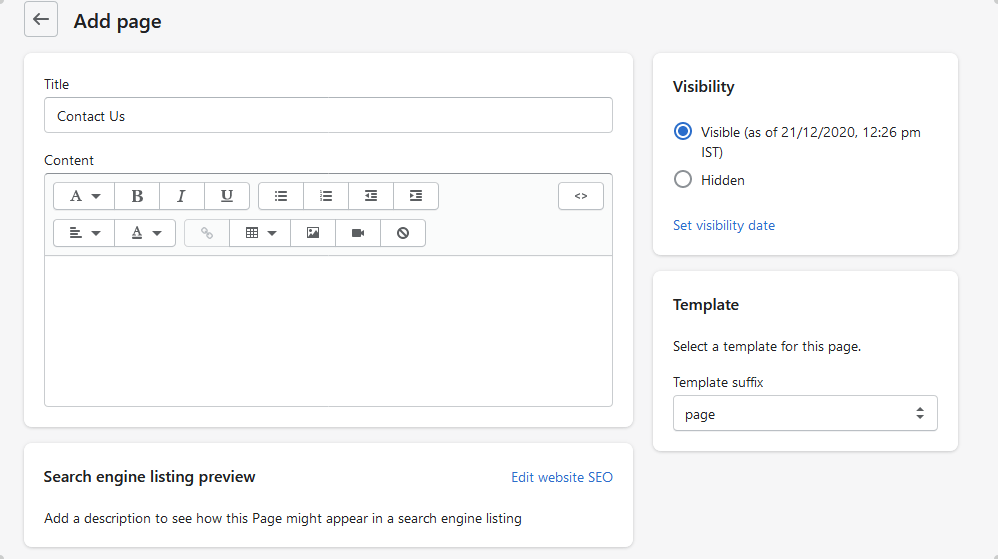
As with your product’s title and description, you need to keep the keywords in mind while writing page title and content, if you want it to rank in search engines. Or if you don’t want it to rank in search engines, you can set the visibility to Hidden.
If you are creating a contact page and want to display contact form on the page, then select the template as page.contact. Once the pages are created, you can add it to your store menu by clicking Navigation in the left hand menu and adding the page to appropriate menu.
Install Apps to Add More Features
With the help of almost more than 2500+ apps available in Shopify apps store, you can add functionality of your store to sell more. An apps helps you enhance the features of your store helping you attract more customers to your store.
There are hundreds of apps available for almost every functionality, both free and paid ones, you can think of in Shopify app store. For example, you can add apps for email collection pop-ups, sales countdown, customer reviews, product recommendations etc.
You can search for your desired apps in Shopify app store, and add it to your store just like adding a theme. Be sure to check its reviews and prices before you add any app to your store.
Here the best apps recommendation from Shopify blog 25 Free Shopify Apps to Check Out In the Shopify App Store.
Setup Shipping and Delivery
If you are selling physical products tat requires shipping and delivery, you must setup it before launching your store. To setup shipping, click on Settings in left side menu and then click Shipping and delivery to open the delivery methods page.

To add a new shipping location and rates, create a new shipping profile by clicking Create new profile. It will take you a page to create new shipping profile.

Enter the shipping name, this only for the internal purpose, your customers won’t see this. Then select all the products you want to add to this shipping profile.
After that you need to create shipping zone, these are different country where you want to ship your products. To do so click on Create shipping zone. This will open a popup, where you can add the shipping name and select the countries toy want to ship.

After this you need to add the shipping rates to the created shipping zone. To do this click on the button Add rate.

You can setup your shipping rates here or if you have installed any shipping apps, you can select Use carrier or app to calculate rates.
Add Google Analytics to Your Store
Before launching your store, you must add Google analytics to start tracking your website performance from day one. This will help you track your store traffic and other eCommerce metrics. To add Google analytics, go to left navigation bar and click Preferences and enter your tracking code under the section Google analytics.

To learn more about setting Google Analytics in your Shopify store, visit adding Google analytics code
Add a Domain Name
Now to make your site live, you need a domain name. You have two choices either buy a domain name from Shopify itself or from other providers like GoDaddy, NameCheap etc.
If you buy a domain from Shopify, usually comes at $14 USD/year, it will automatically be added to your store. But if you buy from other providers usually comes at $10 USD/year, then you need to add it to your store manually.
Adding a Domain Manually
To add a domain manually, on the left navigation menu go to Settings and then Domains and add your domain by clicking Connect existing domain on the top.

After adding the domain, you will need to update DNS record of your existing domain. To do this, log in to your domain registrar control panel and make the following changes to the DNS records
- Edit your A record to point to Shopify’s IP address
23.227.38.65 - Add or rename a CNAME record to point to
shops.myshopify.com
Now your store is live, but don’t forget to remove any storefront password, otherwise no one will be able to access your store frontend. You can remove your storefront password from Preferences page in your Shopify admin panel.
Also do not forget to set your custom domain as your primary domain by navigating to Online Store -> Domains and by using the drop-down menu to selecting your custom domain. Also ensure to check Redirect all traffic to this domain, this will redirect all your visitors from other domain to this primary domain.
Congratulations, Your Shopify Store is Ready
If you have followed all the steps till now then Congratulations. You are now a proud owner of your brand new Shopify store. Now lets look into some way to promote your store and start earning money!
Promote your Shopify Store
Now that you have setup your store, you need to market and promote it to get customers to your store and buy your products. Otherwise there will be no use of a store if no-one buys your products from it.
There are many ways to promote your store like content marketing and SEO, Social Media Marketing, Paid ads, Email marketing, etc.
Social Media Marketing
In order to get some traffic to your online from the very beginning of your business, you’ll need to build brand awareness and excitement for your product. In today’s society, due to the increased use of mobile devices and smartphones, the fastest way to get the traffic is via social media.
Popular social media platforms are – Instagram, LinkedIn, Facebook, Pinterest, and Twitter – to name a few. In the starting focus your marketing efforts on the platform where your target audience is most active.
Social media marketing is a great method to driving online traffic because it allows you to directly engage with your customers. So while you not only drive traffic to your website but you can also build a community for your customers.
Email Marketing
Another way to drive traffic to your store is by building your email list and using email marketing to communicate to your customers.
As per research, 86% of business persons like to use email while communicating for business purposes. So you must use email as a tool to attract customers from the start of your online store
Content Marketing and SEO
Nowadays, content marketing and SEO are the most effective methods to promote your eCommerce stores.
High-quality content helps you rank well and drives traffic to your store. It also builds trust with your visitors which increases sales.
You can learn more about content marketing at Ecommerce content marketing.
Conclusion
Now that you have setup you Shopify store and now on the way to making it successfully.
Creating a Shopify store is just the beginning of a beautiful journey, I hope your Shopify store will be as successful as you want.
Do tell me your experiences with Shopify or if you want me to add something more in this post, let me know via comments below.


